Advertisement
Whether we are someone just starting out on our guitar journey, or one who has been taking that journey for a while and has reached an intermediate level, or perhaps someone who is a straight up pro, it’s always a great idea from time to time to take it back to the basics. Whether the set end goal is to be a great rhythm guitarist strumming along to their favorite songs in front of a campfire with friends, or to combine both rhythm and lead as a solo guitarist or an ensemble, or the objective perhaps is to be a shredder lead guitarist, a solid knowledge of the basic chord shapes is imperative! Notice the use of the word “shapes”. Chord shapes are movable; therefore we can place them in open position OR turn them into barre chords and place them wherever needed on the fretboard. This being the case, let’s take a brief look at the basic foundational movable chord shapes: CAGED and also Em, Am, and Dm, starting in their open positions.
Now, to play ANY chord on the guitar clean, so that every note on every string used within the chord rings out clearly, the first step is the orientation of our fingers. (Index=1st, Middle=2nd, Ring=3rd, Pinky=4th) It is imperative that we curl each finger at the first and second knuckle, creating a bridge under each finger so that the ONLY part of each finger that touches ANYTHING is our fingertip. A good way to grasp the concept of this is by supinating (palm up) your fretting hand and grasping a tennis ball. (If you are right handed, your fretting hand would be your left hand. If you are left handed, your fretting hand would be your right hand.) Notice that your hand forms a “cat claw” like appearance and your fingers are indeed curled at the first and second knuckles. This is the principal positioning/orientation that your fingers will take when performing basic open chords. (An exception to this rule would be when performing barre chords, where one or more fingers are curled at the second knuckle only, or not curled at all. However, the non-barred fingers within a barre chord would be curled at both knuckles.) The second step would be to place your fingertips firmly on the strings directly behind the frets.


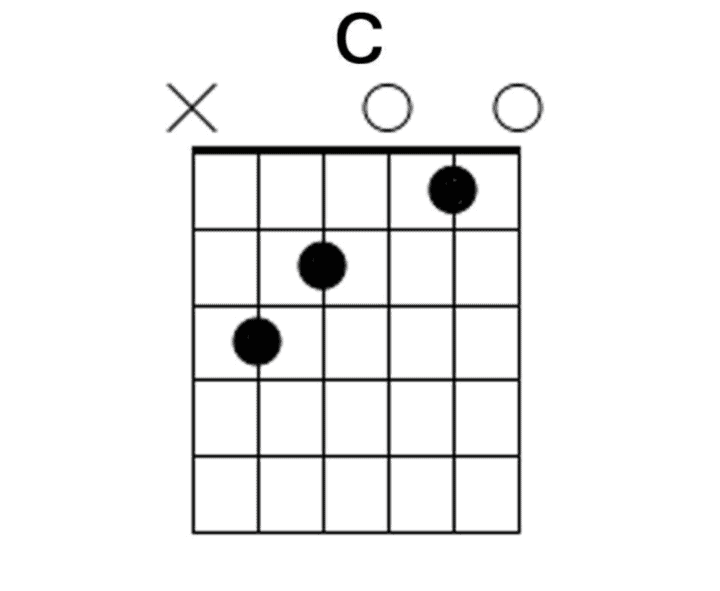
Using the CAGED system, we will start with the C shape, playing it in open position as a C chord. To do this we would ensure that our 1st, 2nd, and 3rd fingers are curled at the first and second knuckle and place our 1st finger on the 2nd string, first fret. Next we will place our 2nd finger on the 4th string, 2nd fret. Finally, we place our 3rd finger on the 5th string, 3rd fret. Notice that the 1st and 3rd strings are open. Strum from the 5th string down keeping in mind that the 6th string will not be used at this time. If our fingers are curled properly, so that the only part of each finger that touches the string is our fingertip, the notes produced by each string including the open ones will ring out clearly and unhindered.
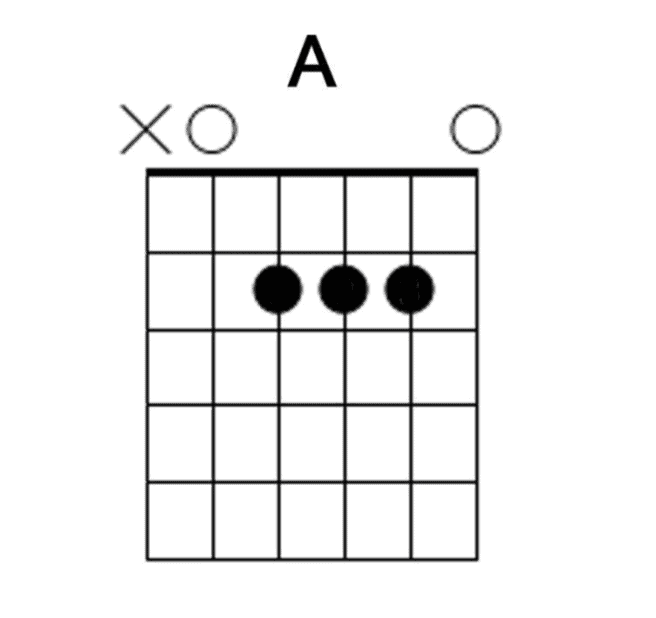
Next in the CAGED sequence is the A shape. There are (3) ways to play the A shape in its open position as an A chord. As we examine all 3, keep in mind that the 6th string will not be used at this time. First up is ‘3 finger A #1’ To play this we will ensure that our 1st, 2nd, and 3rd fingers are curled at both knuckles and place our 1st finger on the 4th string, 2nd fret. Next we place our 2nd finger on the 3rd string, 2nd fret. Finally, we place our 3rd finger on the 2nd string, 2nd fret. Notice that the 1st and 5th strings are open and our pinky is not being used. Strum from the 5th string down. Now, on to ‘3 finger A #2’ To play this in open position, we will ensure that our 2nd, 3rd, and 4th fingers are curled at both knuckles and place our 2nd finger on the 4th string, 2nd fret. Next we place our 3rd finger on the 3rd string 2nd fret. Finally, we place our 4th finger on the 2nd string, 2nd fret. Notice again that the 1st and 5th strings are open and for this one our 1st finger is not being used. Strum from the 5th string down. Finally, we have ‘One finger A’. This will be a barre chord. A barre chord is when we use one finger to play or fret more than one string. To play ‘One finger A’ in open position, we will ensure that our 1st finger is curled at the 2nd knuckle only and placed on the 2nd fret across the 4th, 3rd, and 2nd strings.
The 1st knuckle should be hyperextended to a small degree, the opposite of curled. This hyperextension can be achieved by squeezing the neck slightly with our thumb (or upper palm) and first finger. Notice that the 5th string is open. The 1st string, which normally would be open can either be muted by the flesh from the underside of the 1st finger, OR can be played open if possible. Strum from the 5th string down. In another article, we will consider the G, E & D shapes in their open positions. Happy playing!
